This project came about when a friend of mine and I were discussing our babies' first birthdays. She wanted a tutu for her little girl and sent me a picture. She complained that she couldn't find anywhere that made tutus.
So curiosity got me and I researched it. There are a lot of places in America to buy tutus and many on places like Etsy but that means Dollars and shipping and with the exchange rate being what it is I doubt she would want to pay $25 minimum for a tutu that her baby may wear once. My brain and hands said " You know, we could so make that and for a whole lot less." So we did.
I found a great site www.misstutu.com which gives you a free video lesson on how to make a basic tutu using tulle and elastic. I tried it out and made a few modifications to suit my needs. Here are a few tips and tricks I learnt:
- Tulle comes in different stiffnesses and the hard tulle will make the tutu flair out more but is very scratchy. My material shop stocked only hard tulle but what she uses in the video is more like mesh which comes in many colours and is super soft.
- The elastic tends to stretch as you put on more strands and I found this frustrating so I switched to ribbon and simply knotted where it would tie and left some extra to tie a bow. It looks very pretty and is more adjustable.
- I varied the length of my tutus according to age and height of the child (I used the Naartjie kids clothing size guide) and used a standard tulle strip width of 10cm.
I added some detail to the yellow and pink tutus:
Ribbon Roses
- Measure out a length of ribbon in the colour and width of you choice ( the wider the ribbon the bigger the rose). I used about 20cm (40cm as it's folded) length of a 25mm ribbon. Hint: Don't cut the ribbon as you will waste a portion of it in the later steps if you do.
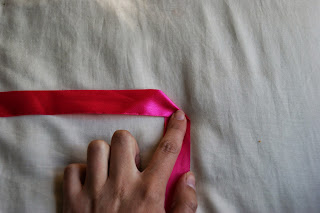
- At the halfway mark (so 20cm in this case) fold the ribbon so it forms a 90 degree angle.
- Fold the bottom piece up over the first fold.
- Then fold the left side over to the right. Repeat this process now folding the top piece down and the left piece to the right etc. to form a concertina. Continue until the end of the ribbon.
- Holding the two ends between your thumb and index finger let go of the concertina so it opens up. Don't let go or it will unravel.
- While loosely holding the ends pull the longest end so that the ribbon bunches up on top of your thumb and index finger. Pull until all of the ribbon has bunched together and your rose is as tight as you would like it.
- Stitch the rose together by sewing through the middle ensuring all the layers are linked together. This may require a few stitches to achieve. You can now trim the long end and the rose can be sewn onto the tutu.
Butterfly Bows
- Using 5mm ribbon wrap it around your index and middle finger three (or more) times to form concentric loops. Trim away any extra ribbon.
- Pinch the loops in the middle and tie a length of the same ribbon (the length is your choice) around the middle to secure them. Separate the loops to form a butterfly.


No comments:
Post a Comment